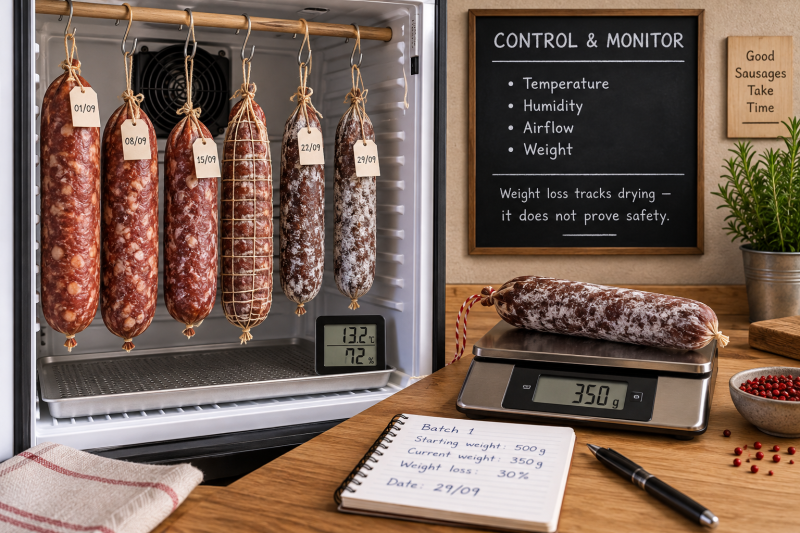
An old refrigerator may not be the first piece of sausage-making equipment that comes to mind, but it can make an excellent starting point for a home curing and drying chamber.
Think about what a refrigerator already gives us:
- An insulated cabinet
- A washable interior
- A fitted door and seal
- Adjustable shelves and mounting points
- A refrigeration system
What it doesn't normally provide is the range of temperature and humidity control required for curing and drying sausages.
Fortunately, we can add those controls without rebuilding the refrigerator.
In its simplest form, the conversion consists of an old working fridge, external temperature and humidity controllers, a small humidifier, gentle air circulation and a suitable way of hanging the sausages.
No butcher's drying room required.
What Are We Trying to Build?
A curing chamber isn't simply a refrigerator with sausages hanging inside it.
We're creating a small environment in which we can control several things:
- Temperature
- Relative humidity
- Air circulation
- Spacing around the sausages
The chamber provides the ability to control these conditions.
The recipe and process tell us what those conditions should be.
That's an important distinction because there is no single temperature and humidity setting suitable for every fermented or dry-cured sausage.
Start with a Working Refrigerator
You don't need a new refrigerator.
An older fridge that still cools reliably can be ideal.
Before converting it, check:
- The compressor starts and stops normally.
- The door closes securely.
- The door gasket seals properly.
- The interior is clean and undamaged.
- There is no persistent unpleasant odour.
- Any original drain is clear.
- There is sufficient internal height for hanging sausages.
A tall refrigerator without a large freezer compartment is particularly convenient, but many different fridge designs can be adapted.
Clean It Thoroughly First
Remove the shelves, drawers and any unnecessary removable fittings.
Wash and sanitise the interior and removable components with suitable food-safe products and allow everything to dry completely.
Don't forget the door gasket, drain channel and corners where old food residue can accumulate.
This is going to become an environment containing meat for weeks rather than somewhere we occasionally store a carton of milk.
Why the Original Thermostat Usually Isn't Enough
A household refrigerator is designed to keep food cold.
Its thermostat may therefore operate roughly within normal refrigeration temperatures and may not allow us to maintain the warmer conditions required by some sausage processes.
For example, a particular drying or maturation process might call for a temperature in the low-to-mid teens Celsius, while another stage or process may require something warmer.
The answer isn't to modify the refrigerator thermostat.
Instead, we can use an external plug-in temperature controller.
The External Temperature Controller
The principle is very simple.
The refrigerator plugs into the cooling outlet of the temperature controller.
The controller itself plugs into the mains supply.
A temperature probe is placed inside the chamber.
When cooling is required, the controller supplies power to the refrigerator. When the required chamber temperature has been reached, it switches the refrigerator off.
The refrigerator's own thermostat should normally be set sufficiently cold that it doesn't interfere with the external controller.
What Temperature Range Should the Controller Cover?
We aren't choosing a curing temperature here. We're choosing equipment capable of handling the temperatures we may need.
For a versatile home curing chamber, I would look for a controller capable of comfortably controlling at least approximately:
5–25°C (41–77°F)
This does not mean that sausages should be dried anywhere between 5 and 25°C.
It means the controller has sufficient operating range to accommodate the different processes we may encounter.
Many drying and maturation processes operate somewhere in the low-to-mid teens Celsius, while fermentation stages can require warmer conditions.
Always use the temperature specified by the particular recipe, starter culture and process you're following.
An Example of a Suitable Controller
A commonly available example is the Inkbird ITC-308.
It is a plug-and-play controller with separate cooling and heating outputs, a temperature probe, calibration function, alarms and compressor-delay protection.
Its actual control range is far wider than we require for a curing chamber, so our suggested 5–25°C working capability sits comfortably inside it.
Other brands can perform exactly the same job. Inkbird is simply an easily recognised example of the type of controller we're looking for.
Don't Make the Compressor Work Unnecessarily Hard
A refrigerator compressor shouldn't be switched rapidly on and off.
Good temperature controllers therefore allow a temperature differential and provide compressor-delay protection.
In simple terms, we don't need the chamber desperately trying to maintain exactly 15.0°C every second of the day.
A small controlled variation is normal.
Compressor-delay protection also prevents the controller from restarting the refrigeration compressor immediately after it has stopped.
Use the controller manufacturer's recommended settings and understand these functions before loading the chamber.
Cooling Doesn't Mean Heating
There is another limitation worth understanding.
A refrigerator can cool the chamber, but switching the refrigerator off can't make the chamber warmer than the surrounding room.
If your curing chamber is standing in a room at 10°C and your process requires a higher chamber temperature, the refrigerator can't create that heat.
A dual-stage controller can operate a separate low-power heating device when necessary.
Whether heating is required depends heavily on where you live and where the chamber is installed.
In a warm climate, additional heating may rarely be necessary. In a cold cellar or garage, it may become important.
Now We Need to Control Humidity
Temperature is only half of the chamber.
Drying sausage means removing moisture in a controlled manner.
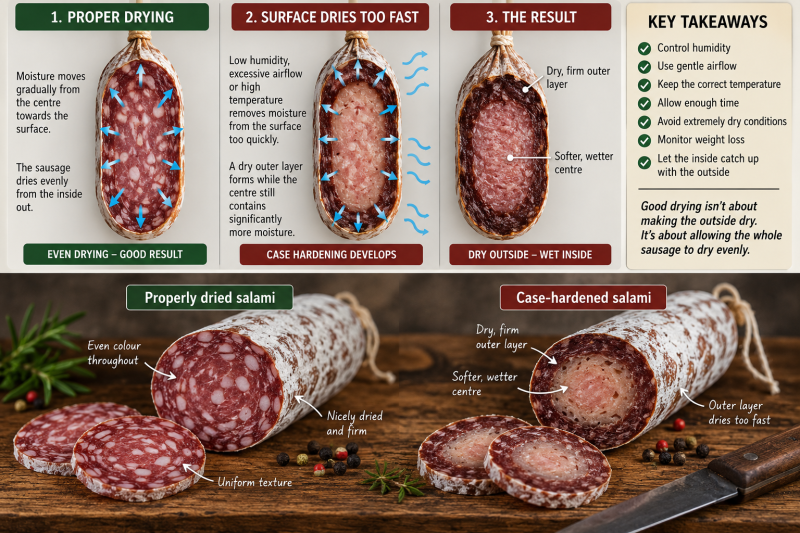
If the environment is too dry or airflow is excessive, the outside can dry considerably faster than moisture can migrate from the centre.
This can contribute to case hardening, which we've discussed separately.
On the other hand, excessive humidity can create its own problems.
That's why we want adjustable humidity control rather than simply hoping the refrigerator happens to produce suitable conditions.
The Humidity Controller
A dual-output humidity controller works similarly to our temperature controller.
It measures relative humidity using a sensor inside the chamber.
One output can operate a humidifier when humidity becomes too low.
The other can operate a dehumidifier when humidity becomes too high.
Again, we aren't looking for one universal humidity setting.
We're looking for a controller with a sufficiently broad working range.
A controller capable of working broadly across the relative-humidity range gives us the flexibility to follow the requirements of different recipes and stages.
The Inkbird IHC-200 is one example. Its specified control range is 5–99% RH and it provides separate humidification and dehumidification control.
Choosing a Humidifier
A small humidifier is usually sufficient for a domestic refrigerator-sized chamber.
One feature is particularly important:
It should automatically start operating when electrical power is supplied.
Remember that the humidity controller works by switching power to the humidifier.
Some modern electronic humidifiers don't restart automatically after the electricity has been interrupted. They wait for somebody to press the power button again.
That's inconvenient when a controller is supposed to switch the appliance automatically.
A simple mechanically switched humidifier can therefore sometimes be better suited to this job than a complicated electronic model.
Choose something that:
- Fits comfortably inside the chamber
- Has adequate but not excessive capacity
- Restarts automatically when power returns
- Can be cleaned easily
- Has a stable water reservoir
Do We Need a Dehumidifier?
Possibly — but don't automatically buy one before testing the chamber.
A refrigerator containing several kilograms of freshly stuffed sausage behaves very differently from an empty refrigerator.
The meat releases moisture as it dries and relative humidity can rise substantially.
The refrigeration cycle itself can also remove moisture through condensation.
Depending on the fridge, room climate and amount of meat, that may provide enough moisture removal at some stages.
If humidity consistently remains above the range required by your process, a small dehumidifier controlled by the humidity controller may be useful.
Build and test the basic chamber first, then add equipment because measurements show that you need it.
Air Circulation Matters
We don't want pockets of stagnant air around the sausages.
A small fan can provide gentle circulation inside the chamber.
A low-voltage computer or USB fan is often sufficient.
But there's an important word in that sentence:
Gentle.
We're not trying to create a wind tunnel.
Strong airflow directed continuously at the sausages can accelerate surface drying and contribute to case hardening.
A small fan can be positioned so that it circulates chamber air without blowing directly onto one row of sausages.
A speed controller or timer can also be useful if the fan moves too much air.
Air Circulation Isn't the Same as Fresh-Air Exchange
This is easily confused.
An internal fan simply moves the air already inside the refrigerator.
Fresh-air exchange replaces some chamber air with air from outside.
Opening the door for inspection naturally exchanges some air, and depending on the chamber and process this may contribute sufficient exchange for a simple home setup.
More elaborate chambers sometimes incorporate controlled inlet and exhaust ventilation.
For a first home curing chamber, I wouldn't start by drilling ventilation holes into the refrigerator.
Please Don't Randomly Drill Through Your Fridge
The outside of a refrigerator may look like nothing more than thin sheet metal and insulation.
Unfortunately, refrigeration lines, condenser tubing or electrical wiring may be concealed within parts of the cabinet.
Drilling blindly through a wall can therefore turn a perfectly good refrigerator into scrap — or create an electrical hazard.
For a simple conversion, try to avoid drilling altogether.
Thin sensor cables can often be routed through the door opening and allowed to pass beneath the flexible magnetic door gasket without seriously affecting the seal.
If a permanent hole is genuinely necessary, first establish from the manufacturer's technical information where it can safely be made, or have somebody experienced with refrigeration equipment do it.
Don't Modify the Refrigeration System
There's normally no reason to open, cut or alter the refrigerator's refrigeration circuit.
Likewise, a beginner conversion shouldn't require rewiring the refrigerator.
Plug-in controllers are attractive precisely because the original appliance can remain largely untouched.
Fridge → controller → wall socket.
Simple is good.
Creating a Hanging System
Once the shelves have been removed, we need somewhere to hang the sausages.
There are several possibilities:
- Stainless-steel rods
- Stainless-steel racks
- Suitable existing refrigerator shelf supports
- Food-safe hanging rails
Stainless S-hooks make it easy to arrange and move individual sausages.
Make sure the support is strong enough for the expected load.
Several kilograms of sausage hanging from a lightweight plastic fridge fitting can be surprisingly heavy.
The sausages should hang freely without touching the walls, floor or each other.
Add a Drip Tray
A removable food-safe tray at the bottom makes cleaning much easier and can catch occasional drips during the early stages of processing.
Don't block an important refrigerator drain or air passage with the tray.
Where Should the Sensors Go?
Sensor placement matters.
Don't place the temperature probe directly against the refrigerator's cooling surface or directly in front of the humidifier.
Likewise, don't position the humidity sensor where mist from an ultrasonic humidifier can spray directly onto it.
We're trying to measure conditions representative of the environment surrounding the sausages.
A central position among the hanging products, without touching them, is a sensible starting point.
Use an Independent Thermometer and Hygrometer
I strongly recommend having a second thermometer/hygrometer inside the chamber.
This doesn't control anything.
It simply gives us an independent reading to compare with our controllers.
If one instrument says 72% RH and another says 84%, we know something deserves investigation.
Many inexpensive digital units can also record minimum and maximum values, while Bluetooth or Wi-Fi data loggers can show what happened overnight.
Basic Shopping List
- One working refrigerator
- Plug-in temperature controller
- Plug-in humidity controller
- Small automatic-restart humidifier
- Small dehumidifier if testing shows one is required
- Small low-voltage circulation fan
- Independent thermometer/hygrometer
- Stainless-steel hanging rods or suitable racks
- Stainless S-hooks
- Food-safe drip tray
- Optional Wi-Fi/Bluetooth data logger
Where Can We Source the Parts?
Most components aren't specialised sausage-making equipment.
Temperature and humidity controllers:
Available directly from manufacturers such as Inkbird and from brewing, fermentation, reptile, greenhouse and electronics suppliers.
Humidifier and dehumidifier:
Household-appliance suppliers and online retailers. Concentrate on operating characteristics rather than brand name — particularly automatic restart after power interruption.
Fans:
Computer and electronics shops are excellent sources for small low-voltage fans and speed controllers.
Stainless rods and S-hooks:
Catering-equipment suppliers, kitchen-equipment suppliers and local stainless-steel fabricators.
Thermometer/hygrometer:
Brewing, greenhouse, reptile and electronics suppliers all carry suitable instruments.
There is no need for every component to have "charcuterie" printed on the box.
A Simple Plug-and-Play Layout
The basic arrangement looks something like this:
Wall socket → Temperature controller → Refrigerator
Wall socket → Humidity controller → Humidifier / Dehumidifier
The small circulation fan can use its own low-voltage power supply or suitable timer/controller.
The temperature and humidity probes sit inside the chamber while the mains-powered controllers remain outside.
This arrangement keeps the conversion simple and avoids unnecessary modifications to the refrigerator.
Keep Electricity and Water Apart
A curing chamber combines electrical equipment with a humid environment.
Use properly manufactured electrical equipment appropriate to your local mains supply, keep plugs and controllers outside wet areas, don't overload sockets and don't allow water from the humidifier or condensation to reach electrical connections.
If an installation requires mains wiring rather than plug-in equipment, have it carried out by somebody competent to do that work.
Test the Chamber Before Adding Meat
Don't build the chamber at lunchtime and hang 5 kg of salami inside it that evening.
Run it empty first.
Give yourself enough time to observe several heating, cooling, humidifying and dehumidifying cycles.
Check:
- Does temperature remain controllable?
- How much does it fluctuate?
- Does the compressor cycle reasonably?
- Does the humidifier restart automatically?
- Does humidity overshoot badly?
- Does condensation collect anywhere?
- Is the fan producing gentle circulation?
- Do the independent instruments broadly agree with the controllers?
Correct problems while the chamber contains nothing more valuable than air.
Then Test It Under Load
An empty test is only the beginning.
Fresh sausage contains a great deal of water.
Once several kilograms are hanging inside the chamber, its humidity behaviour can change dramatically.
Watch the chamber closely during the first part of a new production run and record what happens.
This is where a simple notebook or data logger becomes extremely useful.
Keep Records
For each batch, consider recording:
- Product and recipe
- Starting date
- Starting weight
- Temperature readings
- Relative-humidity readings
- Weight during drying
- Any controller adjustments
- Anything unusual you observe
That turns the chamber from a mysterious refrigerator full of salami into a process you can actually understand and repeat.
The Chamber Doesn't Make an Unsafe Recipe Safe
This is perhaps the most important point in the entire project.
A curing chamber is a control tool.
It doesn't determine how much salt or curing agent to use. It doesn't tell us which starter culture is appropriate. It doesn't establish a safe fermentation endpoint, and it doesn't prove that a finished sausage is shelf-stable.
Fermented and dry-cured sausages rely on a combination of controls that can include formulation, curing ingredients, starter culture, fermentation, pH reduction, drying, water activity and sometimes additional interventions.
Use a proven process and follow its specified measurable endpoints.
Don't Copy Someone Else's Controller Display
You'll find plenty of photographs online showing beautiful salamis hanging beside digital displays.
Don't assume the numbers visible in somebody else's photograph are the correct settings for your sausage.
Their recipe, casing diameter, starter culture, processing stage and product may be completely different.
The chamber gives us control. The recipe tells us what to control it to.
Start Simple
Your first curing chamber doesn't need to look like laboratory equipment.
A sound old refrigerator, reliable plug-in controllers, a small humidifier, gentle circulation and some stainless hanging rods can create a very capable home setup.
More sophisticated equipment can always be added later if experience shows that you need it.
That's much better than buying everything first and discovering afterwards that half of it wasn't necessary.
And it fits the philosophy we've followed throughout Dieter's Sausage Kitchen:
Good homemade sausage doesn't require a butcher's shop. It requires understanding the process and controlling the things that matter.
Dieter's Tip: Don't buy every accessory before you've tested the fridge. Start with temperature and humidity measurement and learn how the empty refrigerator behaves. Then add humidification, dehumidification and circulation because your measurements show you need them. A simpler chamber is usually easier to understand and troubleshoot.