You've filled your casing evenly and now have a long coil of sausage in front of you. The next step is turning that coil into individual sausages.
There are several ways of doing this, but for the home sausage maker two methods cover most situations: forming links with alternating twists or tying individual sausages with string.
Which method you use depends largely on the type of sausage you're making.
Before You Start
Don't overfill the casing during stuffing. The casing needs a little flexibility so the sausage meat can move when you pinch and twist the links. A casing packed completely tight may burst as soon as you try to form the first link.
Before linking, gently distribute the filling if you notice any particularly tight or loose areas. Small air pockets can also be released with a clean sausage pricker or fine sterile needle.
Method 1: Alternating Twisted Links
This is the method I normally use for bratwurst, BBQ sausages and similar fresh or poached sausages. It produces a continuous chain of evenly sized sausages without requiring string between every link.
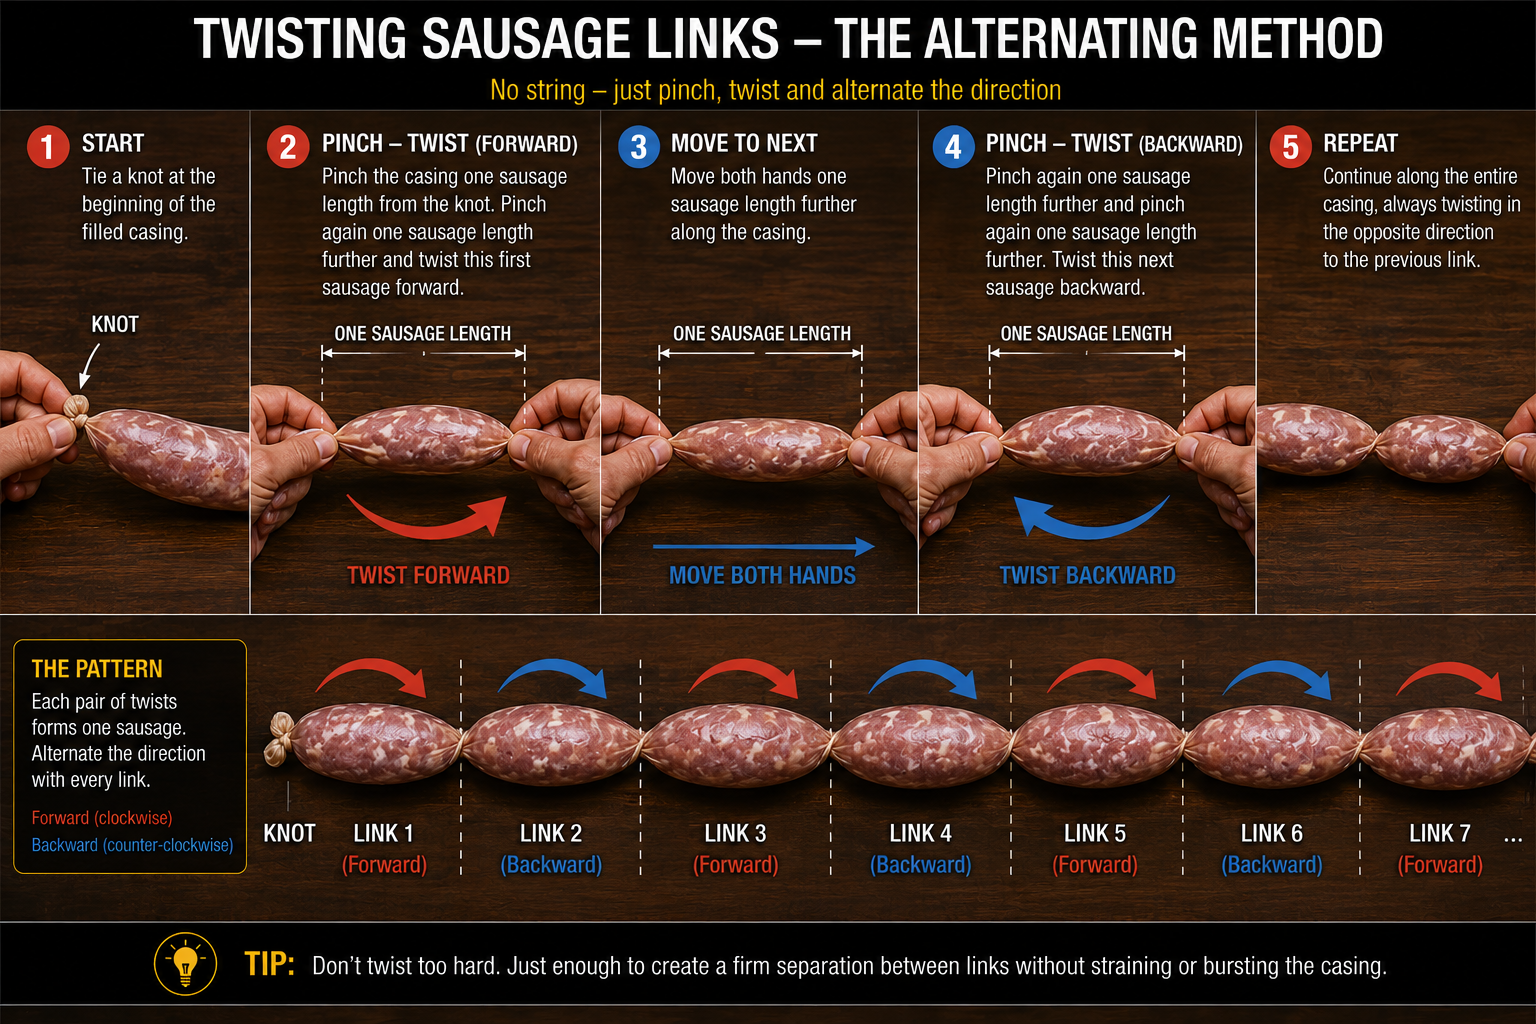
Start by tying off the beginning of the filled casing securely with a knot.
Decide how long you want each sausage to be. For example, if you're making sausages approximately 12 cm long, measure roughly one sausage length from the knot and pinch the casing firmly between your fingers.
Now move your other hand another sausage length further along the casing and pinch again. You have now isolated one complete sausage between your hands.
Rotate that sausage several turns in one direction.
For the next link, move both hands one sausage length further along the filled casing, pinch again and rotate this sausage in the opposite direction.
Continue along the entire casing, alternating the direction of each link:
forward – backward – forward – backward
The alternating direction is important. If every sausage is twisted in the same direction, forming the next link can loosen the twist you've just made.
Understanding the Pattern
It may sound complicated when described in words, but the pattern is actually very simple:
knot---link 1---link 1---link 2---link 2---link 3---link 3---link 4---link 4...
Each pair of pinch points defines one sausage. Link 1 is twisted in one direction, link 2 in the opposite direction, link 3 in the first direction again, and so on.
After a little practice, the movement becomes almost automatic.
How Many Turns?
You don't need to count every rotation precisely. Twist enough to create a clearly defined separation between the sausages without placing excessive strain on the casing.
Consistency is more important than the exact number of turns.
Keeping the Sausages an Even Length
Your first few batches may contain sausages of slightly different lengths, and there is nothing wrong with that.
If you want greater consistency, place a ruler or simple length marker beside your work area. After some practice, you'll become surprisingly good at judging the length by eye.
Method 2: Tying Sausages with String
The second common method is much simpler: instead of twisting the casing between individual sausages, tie it securely with food-safe butcher's string.
This method is commonly used in Europe for salami, larger sausages and products intended to be sliced as cold cuts.
After filling, determine the required length of the sausage, pinch the casing at that point and tie it securely with butcher's string. Continue along the casing as required.
For individual large sausages, the casing can instead be cut after tying, leaving enough casing beyond the knot to ensure it remains secure.
Why Use String?
Larger and heavier sausages place considerably more weight on the casing than a small bratwurst. String provides additional security and also creates a convenient loop when a sausage needs to be hung for smoking, drying or storage.
For traditional salami and some larger products, additional string may also be tied around the sausage to provide support as it hangs.
Twist or Tie?
For everyday bratwurst, fresh sausages and many BBQ sausages, alternating twists are quick, convenient and require nothing more than the casing itself.
For larger sausages, salami and many sausages intended for slicing as cold cuts, tying with butcher's string is often the more appropriate traditional method.
As with many aspects of sausage making, the recipe and the style of sausage should determine which technique you use.
Practice Makes Consistent Links
Don't worry if your first batch looks slightly uneven. Linking sausages is very much a hands-on skill. After you've made a few batches, you'll develop a natural feel for where to pinch, how firmly to hold the casing and how much to twist.
Perfectly identical sausages aren't the goal. Well-filled, securely linked sausages that taste great are far more important.
Reference: Choosing a Linking Method
| Method | Common Uses | Basic Technique |
|---|---|---|
| Alternating Twists | Bratwurst, BBQ sausages, fresh sausages and many poached sausages | Pinch individual sausage lengths and twist consecutive links in alternating directions. |
| Butcher's String | Salami, larger sausages and sausages intended for slicing as cold cuts | Pinch at the required length and secure the casing firmly with food-safe butcher's string. |
Dieter's Tip
Don't stuff the casing too tightly if you plan to make twisted links. You need enough room for the sausage meat to move slightly when you pinch and twist the casing. After a few batches, you'll develop a feel for exactly how firmly the casing should be filled.