Putting food into a glass jar, closing the lid and heating it can look deceptively simple.
But when we want to preserve food so that it can be stored safely at room temperature, there is much more happening than simply heating the contents and creating a vacuum seal.
This becomes especially important for us as sausage makers.
As we explore more liver sausages, cooked meat products and other recipes that can traditionally be prepared in jars, we need to understand the difference between a jar that has merely sealed and food that has actually been processed using a safe preservation method.
A sealed jar is not automatically a safely canned jar.
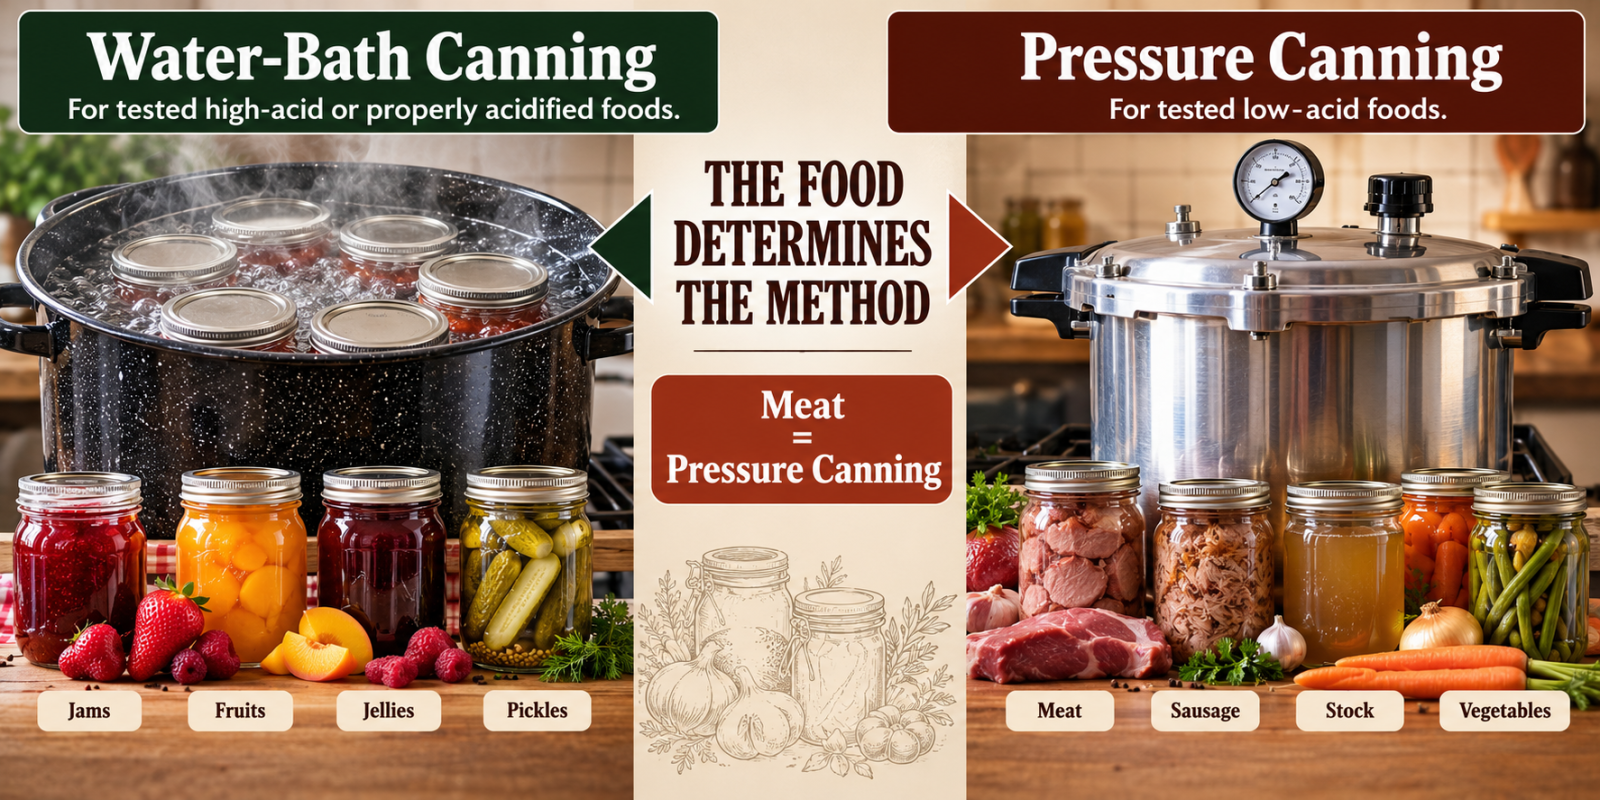
There are two main heat-processing methods commonly used for home canning: water-bath canning and pressure canning. They are not interchangeable, and choosing between them is not simply a matter of preference.
The type of food determines which method is appropriate.
The Most Important Difference: Acidity
The basic distinction between water-bath canning and pressure canning comes down largely to the acidity of the food.
Foods intended for canning are generally divided into two broad groups:
- High-acid or properly acidified foods
- Low-acid foods
High-acid foods can be safely processed using an appropriate tested water-bath canning process because their acidity prevents the growth of Clostridium botulinum, the bacterium responsible for botulism.
Low-acid foods are different.
They require the higher temperatures achieved in a pressure canner when they are being processed for shelf-stable storage.
Meat, poultry and most plain vegetables are low-acid foods.
This means that when we eventually start preserving sausages or other meat products in jars for storage at room temperature, pressure canning becomes particularly important.
What Does Canning Actually Do?
Home canning is a controlled heat-processing method.
The food is prepared according to a tested recipe, placed into suitable jars with the specified headspace, fitted with appropriate lids and then processed using a particular combination of method, time and, where pressure canning is involved, pressure.
During processing, heat destroys microorganisms and inactivates other factors that could cause the food to spoil. Air is driven from the jar and, as the jar cools after processing, a vacuum forms beneath the lid.
That vacuum helps protect the processed food from contamination after processing.
But the vacuum itself is not what makes the food safe.
This distinction is extremely important.
A jar can form a strong vacuum seal even when the contents have not received an adequate heat treatment.
The jar is the container. The tested process is the preservation method.
What Is Water-Bath Canning?
Water-bath canning uses boiling water to heat filled jars for a specified period.
The jars sit on a rack inside a sufficiently deep pot or dedicated water-bath canner and are completely surrounded by boiling water.
During processing, the water must remain boiling and must remain above the tops of the jars.
This method is suitable for foods that are naturally sufficiently acidic or have been safely acidified according to a tested recipe.
Typical examples include:
- Many fruits
- Jams
- Jellies
- Tested pickle recipes
- Other properly acidified foods prepared according to tested recipes
The important words here are tested recipe.
We should not assume that adding a little vinegar, lemon juice or another acidic ingredient automatically makes an otherwise low-acid recipe suitable for water-bath canning.
How Water-Bath Canning Works
The exact instructions for preparing the food, filling the jars, headspace and processing time come from the tested recipe being used.
The general process looks like this:
- Inspect and prepare suitable canning jars.
- Prepare the food exactly as specified in the tested recipe.
- Fill the jars, leaving the specified headspace.
- Remove trapped air bubbles when the recipe requires it.
- Clean the jar rims.
- Fit the appropriate lids according to the manufacturer's instructions.
- Place the jars upright on the rack in the canner.
- Ensure the jars are adequately covered with water.
- Bring the water to a full boil.
- Begin the processing time when the required boil has been established.
- Maintain the required boil throughout the complete processing period.
- Follow the tested procedure for removing and cooling the jars.
For normal boiling-water processing, the water should be at least 2.5 cm (1 inch) above the tops of the jars. For processing times longer than 30 minutes, additional water depth is recommended.
If the water stops boiling during the process, the tested processing requirements have not been followed correctly.
Why Isn't Boiling Water Enough for Meat?
This is the most important question for our sausage kitchen.
Water boiling in an ordinary open canner cannot achieve the same processing temperature as steam under pressure inside a pressure canner.
This matters because meat is a low-acid food.
Under low-acid, moist and oxygen-reduced conditions inside a sealed jar, spores of Clostridium botulinum can present a particularly serious hazard if the food has not been processed correctly.
Ordinary boiling-water processing is therefore not the appropriate method for making meat shelf-stable in jars.
Meat intended for shelf-stable home canning requires an appropriate tested pressure-canning process.
Cooking Meat Is Not the Same as Canning Meat
This distinction deserves particular attention.
We might cook a sausage until it reaches a safe internal temperature for eating. At that point, the sausage is cooked.
That does not mean we can place the cooked sausage into a sealed jar and store it safely in the cupboard.
Cooking food for immediate consumption and processing food for long-term shelf-stable storage are two different objectives.
This also applies to liver sausage.
We may prepare a perfectly safe cooked Leberwurst, put it into a container and keep it refrigerated.
That does not automatically make it a shelf-stable canned Leberwurst.
For shelf-stable storage, the entire formulation, jar size, packing method and pressure-canning process must be appropriate for the product.
What Is Pressure Canning?
A pressure canner is a specially designed vessel that traps steam under pressure.
As pressure increases, the temperature inside the canner can rise above the normal boiling point of water.
This makes it possible to safely process low-acid foods when following an appropriate tested procedure.
Foods commonly requiring pressure canning include:
- Meat
- Poultry
- Meat stocks and broths
- Many plain vegetables
- Other low-acid foods for which a tested pressure-canning process exists
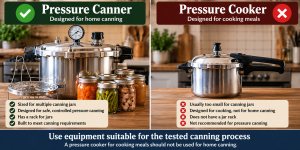
A Pressure Canner Is Not Simply a Pressure Cooker
The terminology can be confusing, particularly because the names used for equipment vary between countries.
A small domestic pressure cooker intended for preparing meals should not automatically be treated as a pressure canner.
Pressure canners used for tested home-canning processes are designed to accommodate jars and to provide the controlled pressure conditions required during processing.
When purchasing equipment specifically for canning, make sure that it is actually suitable for pressure canning rather than assuming that any pot capable of cooking under pressure will do the same job.
How Pressure Canning Works
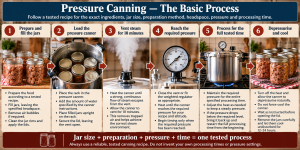
Pressure canning requires more attention than ordinary cooking in a pressure cooker, but the process is logical once we understand what is happening.
The exact preparation, jar size, headspace, pressure and processing time must always come from the tested recipe.
The general procedure is:
- Inspect the pressure canner and make sure it is in proper working condition.
- Place the rack inside the canner.
- Add the amount of water specified by the canner instructions and tested procedure.
- Prepare and fill the jars according to the tested recipe.
- Place the filled jars upright on the rack.
- Secure the canner lid while leaving the steam vent open.
- Heat the canner until a strong, continuous flow of steam escapes from the vent.
- Allow the canner to vent continuously for 10 minutes.
- Close the vent or fit the weighted regulator as appropriate for the canner.
- Allow the canner to reach the required pressure.
- Begin timing only when the required pressure has been reached.
- Maintain the required pressure for the entire specified processing time.
- When processing is complete, turn off the heat and allow the canner to depressurise naturally.
- Do not force-cool the canner or attempt to open it while it is pressurised.
- Follow the manufacturer's and tested-process instructions before opening the lid and removing the jars.
Why Venting the Pressure Canner Matters
The 10-minute venting stage is not simply a warm-up period that can be skipped to save time.
Air trapped inside the pressure canner can lower the temperature achieved at a particular pressure.
Allowing a continuous stream of steam to escape before pressurising the canner removes this trapped air and helps establish the correct steam environment inside.
Start the 10-minute venting period only once a strong, continuous flow of steam is escaping from the vent.
Never Force a Pressure Canner to Cool
When the specified processing time is complete, the pressure canner needs to return to normal pressure naturally.
Do not try to speed this up by pouring cold water over the canner, placing it in cold water or otherwise forcing it to cool.
Rapid depressurisation can interfere with the canning process and may also cause liquid to be forced from the jars.
Wait until the canner has fully depressurised according to the manufacturer's instructions before removing the regulator or opening the lid.
When opening the canner, lift the lid carefully so that escaping steam is directed away from your face and hands.
What If the Pressure Drops During Processing?
This is another very important rule.
If the pressure drops below the pressure required by the tested process at any point during processing, the required processing conditions have been interrupted.
Bring the canner back to the required pressure and restart the complete processing time from the beginning.
This may affect the quality and texture of the food, but shortening the process to compensate is not an acceptable solution.
Altitude Matters
Altitude affects home canning because the boiling point of water decreases as elevation increases.
This means that canning instructions developed for lower elevations cannot always be used unchanged at higher elevations.
For boiling-water canning, tested recipes may require increased processing time as elevation increases.
For pressure canning, the required pressure is adjusted according to elevation and the type of pressure gauge being used.
Always determine your elevation and apply the altitude adjustment specified by the reliable canning instructions you are following.
Do not simply add a few minutes or increase the pressure by guesswork.
Dial-Gauge and Weighted-Gauge Pressure Canners
Pressure canners generally use either a dial gauge or a weighted gauge to indicate or control pressure.
A dial gauge displays the pressure on a scale and needs to remain accurate.
A weighted gauge regulates pressure mechanically by allowing steam to escape as the specified pressure is reached.
The pressure required at a particular altitude can differ depending on which system is being used.
This is another reason why we should never copy a pressure value from one recipe without reading the complete instructions.
Dial gauges should also be checked for accuracy as recommended by the manufacturer or the relevant canning authority.
Use Proper Canning Jars
Use jars designed for home canning and inspect them carefully before every use.
Check for:
- Cracks
- Chips around the rim
- Damaged sealing surfaces
- Other visible defects
Commercial food jars should not automatically be treated as reusable canning jars.
Some are made from different glass or have sealing surfaces that are not intended for repeated home canning.
This is particularly important with pressure canning, where unsuitable jars may have a greater risk of breaking.
Understanding Headspace
Headspace is the empty space between the top of the food and the lid.
It may look like an insignificant detail, but it forms part of the tested process.
Too little or too much headspace can interfere with venting and sealing and may affect the finished product.
Use the headspace specified in the recipe rather than estimating it.
Do the Jars Need to Be Sterilised First?
Not always.
This is another area where old habits and modern canning recommendations are sometimes confused.
Jars used for foods that will be pressure canned do not need to be pre-sterilised because they will be sterilised during the properly conducted pressure-canning process.
Similarly, jars used for foods processed for at least 10 minutes in a boiling-water canner generally do not need to be pre-sterilised.
They should still be thoroughly washed, rinsed and kept appropriately hot before filling.
When a tested boiling-water process is shorter than 10 minutes, the recipe may require the empty jars to be sterilised before filling.
A Sealed Lid Does Not Prove the Food Is Safe
After processing and cooling, we naturally check whether the jars have sealed.
This is important, but it only tells us that a vacuum seal has formed.
It does not tell us whether the food received adequate heat treatment.
A jar processed incorrectly may still seal beautifully.
Never use the appearance of the lid as proof that an untested canning process was safe.
Why Can't We Just Make Up a Processing Time?
Suppose we make a wonderful Bierleberwurst recipe and decide that we would like to preserve it in jars.
It might be tempting to fill the jars, put them into a pressure canner and choose what appears to be a sufficiently long processing time.
That is not how safe canning processes are developed.
Heat has to travel from the outside of the jar to the coldest part of the food inside.
The speed at which that happens depends on several factors, including:
- The composition of the food
- The density and consistency of the mixture
- The size of meat pieces
- The amount of liquid
- The way the jar is packed
- The jar size
- The starting condition of the food
A thin broth and a dense liver sausage do not heat in the same way simply because both contain meat.
This is why we cannot safely invent a processing time based only on the size of the jar.
Refrigerated Jars Are Different
Not every recipe served or stored in a jar needs to be shelf-stable.
This gives us an important distinction for homemade sausage making.
We can prepare a cooked meat product, place it in suitable jars or containers, cool it promptly and store it in the refrigerator.
That is a refrigerated product.
Alternatively, we can prepare a product using a tested canning process designed to make that particular food stable for appropriate room-temperature storage.
That is a shelf-stable canned product.
These should never be confused.
A jar does not automatically make food shelf-stable.
Water-Bath or Pressure Canner?
| Food or Product | Water-Bath Canning | Pressure Canning |
|---|---|---|
| Tested jams and jellies | Yes | Normally unnecessary |
| Tested pickles | Yes | Normally unnecessary |
| Properly acidified foods with a tested process | Yes | Normally unnecessary |
| Meat | No | Yes — using a tested process |
| Poultry | No | Yes — using a tested process |
| Sausage | No | Yes — where a suitable tested process exists |
| Meat stock or broth | No | Yes — using a tested process |
| Most plain vegetables | No | Yes — using a tested process |
This table tells us which general method is appropriate. It does not provide a processing schedule.
The exact preparation, jar size, headspace, pressure, processing time and altitude adjustment must come from the tested process for the particular food.
What About Our Sausage Recipes?
This is where everything in this article becomes particularly relevant to Dieter's Sausage Kitchen.
As we add more recipes involving jars, I will clearly distinguish between products that are:
- Cooked in or placed into jars and then refrigerated
- Processed using an appropriate tested method for shelf-stable storage
If a recipe is intended only for refrigerated storage, I will say so clearly.
If we want to make a shelf-stable product, we need to base the preservation method on reliable tested canning guidance appropriate to that food rather than simply applying a generic pressure-canning time.
This is particularly important with dense products such as pâtés and finely processed liver sausages because their heat penetration may differ substantially from that of loose pieces of meat or broth.
Never Taste a Suspicious Jar
Home-canned food that is leaking, bulging, spurting liquid, unusually foamy, visibly spoiled or otherwise suspicious should never be tasted to determine whether it is safe.
Botulinum toxin cannot reliably be detected by looking at, smelling or tasting the food.
If there is doubt about whether a low-acid product was processed using an appropriate tested method, do not rely on the fact that the lid is sealed.
Start with a Tested Recipe
If you are new to canning, the safest approach is also the easiest:
- Choose a reliable, tested recipe.
- Read the complete process before starting.
- Use the specified ingredients and preparation method.
- Use the specified jar size.
- Use the specified headspace.
- Use the correct type of canner.
- Apply the correct altitude adjustment.
- Follow the specified processing time and pressure.
- Allow pressure canners to depressurise naturally.
- Check the seals after the jars have cooled as directed.
Once we understand these principles, home canning stops being mysterious.
It becomes another controlled kitchen technique — just like keeping sausage meat cold, measuring curing salt correctly or monitoring internal temperature.
There is one principle worth remembering above everything else:
When we start putting our sausages into jars, the jar is not the preservation method. The tested process is.
Dieter's Tip: Never use the appearance of the jar as proof that food has been safely canned. A lid can seal perfectly even when the food inside has not received a safe heat treatment. Start with a tested recipe, use the specified jar size, preparation method, headspace, processing time and pressure, and only then think about adapting flavours. With meat products in particular, never turn an ordinary sausage recipe into a shelf-stable jarred product simply by guessing how long it should be processed.